|
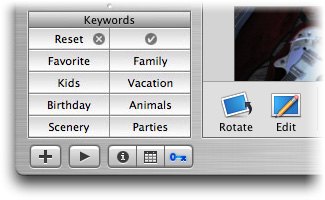
Add Keywords to Photos
Keywords are category labels that you can add to your photos,
allowing you to easily view images by category. To add a keyword
to a photo or selection of photos, just drag them onto any keyword
in the Keywords pane at the bottom left of the iPhoto window.
(To view the Keywords pane, click the Keyword button-it looks
like a key.) To remove all keywords from a photo, just drag it
onto the Reset button in the Keywords pane. To view photos by
keyword, click any keyword button in the Keywords pane.
 Top
iPhoto's Keywords
pane allows you to easily add keywords (including your own) to
photos by way of drag-and-drop. Top
iPhoto's Keywords
pane allows you to easily add keywords (including your own) to
photos by way of drag-and-drop.
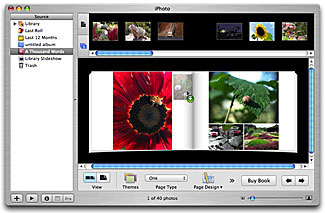
Creating iPhoto Books
iPhoto 5 has a new book-building feature that allows you to create
your own photo books. To start building one, select one or more
images in the iPhoto window, and then click the Book button.
Once you choose the type of book you want, your images appear
in the unplaced photos pane at the top of the window. To add
an image, drag one from the unplaced photos pane onto any blank
area on the book page. If you drag another to the same page,
iPhoto automatically changes the page's layout to accommodate
the new photo. If you want to delete a photo from the book, select
it in the page and press Delete; the photo will be moved back
to the unplaced photos area for later use.
 Top Top
iPhoto book pages can hold more images than what some blank page
templates may suggest. If you drag an image onto a page's blank
space, iPhoto will rearrange the layout.
Get the Photographic Details
If you want to see what camera settings you used to capture a
photo, what date you took a picture, what camera you used, and
other picture details, just select a thumbnail in the iPhoto
window and Get Info. From the Photos menu, choose Get Info (or
press Command-I) to open the Photo Info window. You can view
file and exposure information, as well as set keywords from the
window.
Delete Originals to Save Space
When you drag an image or video into iPhoto from the Finder,
iPhoto creates a copy of that asset in your iPhoto Library folder.
If you'd like to free up disk space on your computer, you can
delete the original.
Rotate Different
When you click the Rotate button, your selected image rotates
90 degrees counter-clockwise. If you want to rotate the image
in the other direction, hold down the Option key while clicking
the Rotate button.
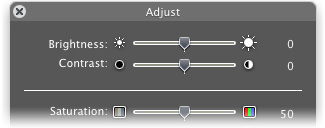
Save Sharpening for Last
iPhoto 5 features a new Adjust palette that lets you edit a photo's
exposure levels, brightness and contrast, saturation, sharpness,
tint, and more. For the best image results, hold off on using
the Sharpening slider until your very last step.
 Top Top
iPhoto's new Adjust palette provides even more editing options
to enhance your photos. Save sharpening for last.
Organize Your Photo Library
You can add folders to iPhoto's Source list to better organize
your photo library. You can organize your albums by event or
year, or keep your albums, slideshows, and books together in
one folder, or in their own separate folders. From the File menu,
choose New Folder and drag whichever albums, slideshows, books,
or other folders you want to it (you can't add individual photos
directly to a folder).
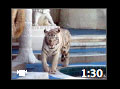
Store Video Clips in iPhoto
iPhoto now works with video. That means that you can import movie
clips, shot on your digital camera, into iPhoto along with your
regular photos. You can also use iPhoto to organize other movies
you have on your computer. To add a movie, just drag a video
clip from the Finder into the iPhoto window. To play a video,
double-click its thumbnail; the video clip opens in QuickTime
Player.
 Top Top
Video clips that are added to iPhoto display a camcorder icon
and time on the thumbnail.
Build Slideshows Smarter
To get a head start on building slideshows, set the global options
for the show first. Then go through your slides and make minor
adjustments to the timing, transitions, Ken Burns Effect, and
other effects later. You can access these options by selecting
a slideshow in the Source list (or create a new one if you haven't
already), and clicking the Settings button in the slideshow pane.
Crop Images Before Using in iDVD
If you want to send your photos to iDVD, always crop them to
a 4:3 aspect ratio (television resolution) in iPhoto before you
do. Most consumer point-and-shoot digital cameras capture 4:3
images natively. However, most SLR cameras produce images with
wider aspect ratios, and images that you crop on your own may
have varying dimensions. To crop a photo in iPhoto for iDVD use,
select an image, click the Edit button, choose 4 x 3 (DVD) from
the Constrain pop-up menu, and click Crop.
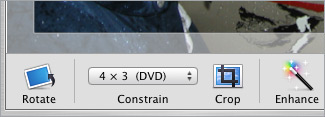 Top Top
Once you select 4 x 3 (DVD) as the cropping aspect ratio, you
can adjust the target area by resizing the crop box before clicking
Crop.
Share Your iPhoto Book Electronically
You can create a PDF file of any iPhoto book that's ready to
share with friends and family. From the File menu, choose Print.
After iPhoto electronically "assembles" your book,
click Save As PDF in the Print dialog. Or if you prefer, you
can print out your book on your inkjet printer; just click the
Print button instead.
 Back to Top Back to Top
|